DOWNLOAD SUPPORT DOCUMENTS
FREQUENTLY ASKED QUESTIONS
  • WHAT KEY ADVANTAGES SET REGAL HARDWOODS APART FROM COMPETING HARDWOOD FLOORING MANUFACTURERS?

    Regal Hardwoods will go above and beyond to ensure the highest standards in the industry. Three skilled craftsmen,each with a different tool, create a unique look by authentically hand scraping each plank. 7ft nominal random length boards create a less busy effect by spacing out the joints. We use only hardwood cores to prevent less denting, and better control of expansion and contraction. Since Regal is the manufacturer of our products, we are able to directly set and maintain extremely high quality standards for all of our products, and by being the manufacturer; we are able to skip traditional broker / distribution fees providing substantial savings to the dealer and end user without sacrificing quality.

  • WHAT IS TITANIUM SCUFFGARD, AND WHAT ARE THE BENEFITS?

    Al2O3 (Aluminum Oxide) is the 2nd hardest element found on Earth next to diamonds. On the MOHs hardness scale, it is ranked at 9. That is impressive considering diamond is ranked at 10.  This is why our Titanium ScuffGARD finish is 5 times more resistant than competing finishes. The aluminum oxide nanoparticles are UV cured with polyurethane. The nanotechnology also prevents a need to sacrifice the wood’s natural beauty because of the transparent nature of the finish, meaning there will not be a glaring plastic screen look on your floors after application. That is why our Titanium ScuffGARD finish is still the most effective finish in the industry.

  • HOW DO I CARE FOR MY Titanium ScuffGARD FLOORs?

    Please consult our Tips and Care guide at the top of this page in the pdf download section for specific instructions on preventative maintenance and regular maintenance practices. Here are maintenance products that we highly recommend for our floors:

    Pro-Care Citrus Cleaner: For Routine Cleaning of Titanium ScuffGARD Finish Floors
    Regal Hardwoods recommends that you use Pro-Care Citrus Cleaner for regular cleaning. It's extremely easy to use - just spray and mop. Pro-Care cleans and enhances the natural beauty of your floors and leaves a fresh citrus aroma with no sticky or oily residue. It can tackle even the toughest stains, but it is gentle enough for the most delicate floor finishes. Ask your local Regal dealer to purchase.

    • The natural degreaser gently removes tough stains
    • Environmentally safe – leaves no ozone depleters
    • The fast-drying formula gets the job done quickly
    • If your local dealer does not stock it, it is also available on Amazon here.
  • WHAT IS REGAL'S NATURE GARD FINISH, AND WHAT ARE THE BENEFITS?

    Our protective hard wax oil finish enhances the natural highlights of the wood’s colors. The oil seeps into the wood and brings out the inherent beauty and characteristics of the wood grain. To protect the surface, the tough protective wax coating creates a solid barrier that helps keep your floors beautiful through the years. In the event you do get a scrape or scratch, the hard wax oil finish allows for spot repairs. Since this is a natural product, this protective finish has low to no volatile organic compounds (VOCs). This finish is especially attractive to commercial settings, when wear patterns from foot traffic can be easily refurbished as part of an ongoing maintenance program with minimal disruption to the business.

  • How Do I Care for my Nature GARD Oil Finish Floors?

    Woca Nautral Soap: For Routine Cleaning of Nature GARD Finish Floors
    For products finished with our Nature GARD hard wax oil finish, Regal Hardwoods recommends that you use Woca Natural Soap for post-installation maintenance and every day cleaning. Woca Natural Soap is made up of emollients extracted from soy beans and coconut oils, which also retain the moisture in the floor, just as quality soap would for your hands. As they dry and form an invisible film on the surface, the floor receives added protection against wear and dirt. Natural Soap is only to be used for cleaning and maintenance of oiled, waxed, and soaped surfaces. Please follow Woca's step by step application instructions in this video:
    Mixing specifics/instructions are covered in the "Tips and Care" support document in the pdf download section. This product is also available in convenient Natural Soap Spray bottle (no mixing necessary).

    Woca Oil Refresher: For Quarterly Restoration of Nature GARD Finish Floors
    Woca Oil Refresher should be used for restoring luster and beauty to oiled wood floors, as well as adding a protective, moisture resistant layer to the surface of the floor. WOCA Oil Refresher Natural should only be used for natural oiled floors. Regal Hardwoods recommends an initial coat of Woca Oil Refresher or Woca Natural Soap right after installation for maximum resistance. WOCA Oil Refresher combines efficient cleaning with simultaneous re-oiling. The oil penetrates into the wood and provides the surface with a protective matte film. The use of WOCA Oil Refresher will extend the life of the oil finish, therefore, extending the time between periodic oil maintenance application. Please follow Woca's application instructions:

    Oil Refresher should not be used more than four times per year as this may create unwanted build-up.
    Coverage: 1,600 - 2,100 sq. ft. / liter

  • HOW DO I INSTALL LEVEL LOCK 5G FLOORS?

    1. Begin laying planks/tiles from the left side of the starting wall and work to the right side. The tongue of the plank should face the starting wall.
    2. Place 1/4" (6.35 mm) spacers between the short and long side of the planks/tiles and the wall. Always position one spacer between the wall and where the planks/tiles join.
    3. The end joints of the planks/tiles in the first row are assembled by inserting the tongue side into the groove side of the previous plank/tile at a low angle. Gradually lower the plank/tile down flat until the end joint closes, ensuring that the planks/tiles are perfectly aligned. Install remaining full planks/tiles in the first row.
    4. The last plank/tile in the first row will need to be cut. Measure the distance between the wall and the surface of the last full plank/tile. Subtract 1/4"(6.35 mm) from this measurement to allow for the spacer. If this measurement is less than 8" (20 cm), the first plank/tile in the row should be cut. The first and last plank/tile in each row should be at least 8" (20 cm) in length. Planks/tiles are cut using a sharp utility knife and a square. Score the surface of the plank/tile with the knife and snap the plank/tile at the score line.
    5. The remaining piece cut off from the last plank/tile in the first row may serve as the first plank/tile in the second row provided it is at least 8" (20 cm) long. Always stagger end joints from row to row a minimum of 8" (20 cm) apart.
    6. Install the long side of the first plank/tile of the second row. Place a 1/4" (6.35 mm) spacer between the wall and the short side of the plank/tile. Check groove on plank to make sure it is clean and free of debris. To start the first row, press the end seam of the second plank into the end seam of the first plank, and then lock them together by laying the plank down. Complete the entire first row in this manner.
    7. Maintain an expansion gap of approximately 1/4" from the wall. Also ensure a distance of 5mm to all fixed objects in the room, e.g. pipe passageways, door frames etc.
    8. Install the first plank in the second row by inserting the long side tongue into the groove of the plank in the first row. This is best way with a low angle of the plank.
    9. Install the second plank of the second row. Position the long side of the plank with the tongue side at a about a 30o angle, fully engage into the receiver of the first row of product. Lower the plank/tile with firm pressure to the floor, ensuring that the end joint is overlapping and perfectly aligned; push the end joint downward till the end of the plank/tile clicks in place. This may require a rubber mallet to tap-assist planks completely into engagement. Continue installing planks/tiles in the second row. It is important to make sure that the first two rows are straight and square as they can affect the entire installation.
    10. Continue working from left to right, row by row. Be sure to maintain a 1/4" (6.35 mm) space around all walls and vertical objects. To maintain a random appearance, remember to offset end joints a minimum of 8" (20 cm). It is critical to keep these two rows straight and square, as they are the 'foundation' for the rest if the installation. Check squareness and straightness often.
    11. Continue installing planks and make sure to achieve a random appearance with end pieces of minimum 15cm. Check that all planks are fully engaged; if a slight gapping is found, the gap can be tapped together by using a tapping block and a scrap of flooring to cover the tapping block in order to avoid damages on the planks.
      • Cut using jigsaw or circular saw.
      • When fitting around obstacles or into irregular spaces, Level Lock 5G can be cut with handsaw.
      • Protect all expose edges of Level Lock 5G by installing wall molding and/or transition strips.
      • For wet areas such as bathrooms caulk the perimeter of the floor with a silicone caulk.
      • If you use the spacers for expansion gap from wall, remove spacers and install molding pieces.
    12. The maximum area that can be installed without an expansion joint is 30ft x 30ft.
  • WHY IS AUTHENTIC HAND-SCRAPED WOOD FLOORING SUPERIOR OVER MACHINE-SCRAPED FLOORING?

    Machine-scraped hardwood floors have a repetitive pattern creating an unauthentic look, notoriously found in vinyl products. The repetitive pattern may not be noticeable in a small sample, but it can be very noticeable when installed in your home. Authentic hand-scraped wood flooring bypasses that problem because each board is uniquely produced so that no two boards are the same. A wise American once said: "The bitterness of poor quality is remembered long after the sweetness of low price is forgotten." - Benjamin Franklin

  • HOW DO I KNOW IF YOUR PRODUCTS ARE TRULY 100% HANDCRAFTED?

    If you do not see repetitive patterns in your floor, then each of your boards were truly 100% hand-scraped. Please beware - although many competing products are advertised as hand-scraped, they are actually put through a machine-scrape manufacturing process that tries to replicate Regal products’ authenticity.  The main reason behind this bait and switch is to reduce cost. We do not believe in undercutting our customers. Regal Hardwoods gladly honors our promise to produce unique products for our customers, so each plank of our wood is skillfully honed by our master craftsmen. Regal Hardwood’s truly authentic hand-scraped flooring products will bring a beautiful and rich look to your home that competing products cannot.

  • WHICH IS A BETTER PRODUCT, A 3/8 INCH 7 PLY, OR A 1/2 INCH 5 PLY PRODUCT?

    When dealing with engineered hardwoods, the number of plies determines the stability of the product, not the overall thickness. Therefore, a 3/8 inch, 7-ply hardwood core would be more stable than a 1/2 inch, 5-ply hardwood core.

  • ARE REGAL HARDWOODS PRODUCTS ECO-FRIENDLY?

    Regal Hardwoods is dedicated in preserving the environment for our future generations. We comply with California Air Resources Board’s (CARB) stringent requirements for formaldehyde emissions. Our finishes have low volatile organic compounds (VOCs) to conserve the environment. For questions related to CARB compliance, please visit their official site at: http://www.arb.ca.gov/toxics/compwood/compwood.htm

  • WHAT IS THE LACEY ACT?

    The Lacey Act is a conservation law in the United States that makes it unlawful to import, export, transport, sell, receive, acquire, or purchase in interstate or foreign commerce any plant, with some limited exceptions, taken in violation of the laws of a U.S. State, or any foreign law that protects plants. Regal Hardwoods incorporates sustainable forestry practices and never condones illegal logging. We require all our raw material suppliers to be Lacey Act compliant.

  • SHOULD I CHOOSE A SITE-FINISHED FLOOR OR A PRE-FINISHED ALUMINUM OXIDE FLOOR?

    The only advantage to a site-finished floor is that you can customize your color, but with so many pre-finished options today, it is not necessary to go through the hassle of the sanding and finishing process. Site finished flooring typically uses 2 or 3 coats of polyurethane finish. Where they fall short is that they do not have nanotechnology engineered aluminum oxide in them. On average, site finished flooring will need recoating every 5 to 7 years, but our pre-finished floors are guaranteed for at least 50 years. Site finished flooring carries no warranties on finish or structure. Site finished flooring also requires extensive cleaning and touch-up from the sanding and staining process. Site finished floors also cure in an uncontrolled environment allowing for dust and trash to be trapped in the finish. We take all of the work away with superior prefinished products.  

  • WHAT'S THE DIFFERENCE BETWEEN A HARDWOOD CORE AND A SOFTWOOD CORE?

    A 7 ply Baltic Birch hardwood core is much more stable than softwood core. It is best for providing structural stability and preventing most expansion and contraction of the floor. Most manufactures use poplar, compressed fiber board, or other soft wood options to reduce cost & weight, allowing them to ship more due to freight restrictions.

  • I'M INSTALLING REGAL HARDWOODS, DO I NEED TO ACCLIMATE MY FLOORING?

    Acclimation is not required to install our engineered hardwood floors. Prior to installation of engineered hardwoods the job site temperature and relative humidity levels MUST be carefully measured. The homeowner MUST maintain the recommended ranges (60° to 80° F & 35 to 50 Relative Humidity) to ensure the best protection for the lifelong durability of your floor.

  • HOW RELATIVE HUMIDITY IMPACTS WOOD FLOORS

    Over the past decade there has been huge controversy over engineered vs. solid wood flooring. Engineered flooring was designed to be more dimensional stable than solid under certain conditions. Most manufacturers have found by maintaining proper relative humidity (typically between 35 to 55%) engineered flooring remains reasonably stable where solid flooring will see side affects like gapping. Engineered will also see side affects but at lesser amounts.

    If engineered flooring is exposed to high or low RH conditions one may see irreversible affects like checking, splitting, shear, delamination, dry cupping, etc. When environmental conditions go beyond the caution zone and into the guaranteed to fail zone these side effects will become permanent. Where solid wood flooring will see side affects as well but usually will just have larger gaps between the planks.

    Listed below is a chart which helps outline some of the relative humidity boundaries by the flooring manufacturers.

    Please be sure to ask your retailer regarding proper relative humidity requirements and the possibility of the effects in the “Guaranteed to Fail” zone. If you live in a location where the relative humidity typically falls out of the Safe Zone, you might consider purchasing a meter for frequent checks.

  • WHERE IS REGAL HARDWOODS LOCATED?

    We have four locations for your convenience. We are headquartered in Carrollton, Texas, and other branches are in Houston, Austin, and Salt Lake City:

    Regal DFW Headquarters
    1540 Selene Dr. Suite #110

    Carrollton, TX. 75006
    
Tel: 972-620-8833

    Regal Hardwoods Houston
    8790 West Rd. Suite #150

    Houston, TX. 77064
    Tel: 713-462-4420

    Regal Hardwoods Utah
    3752 West 2270 South, Suite A
    West Valley City, UT 84120
    Tel: 385-770-7012

  • HOW DO I INSTALL THE VINYL MOLDINGS FOR RIGIDCORE CLIQ & LEVEL LOCK 5G FLOORING?

    LevelLock 5G molding transition piece tmold, reducer, and end cap all in one
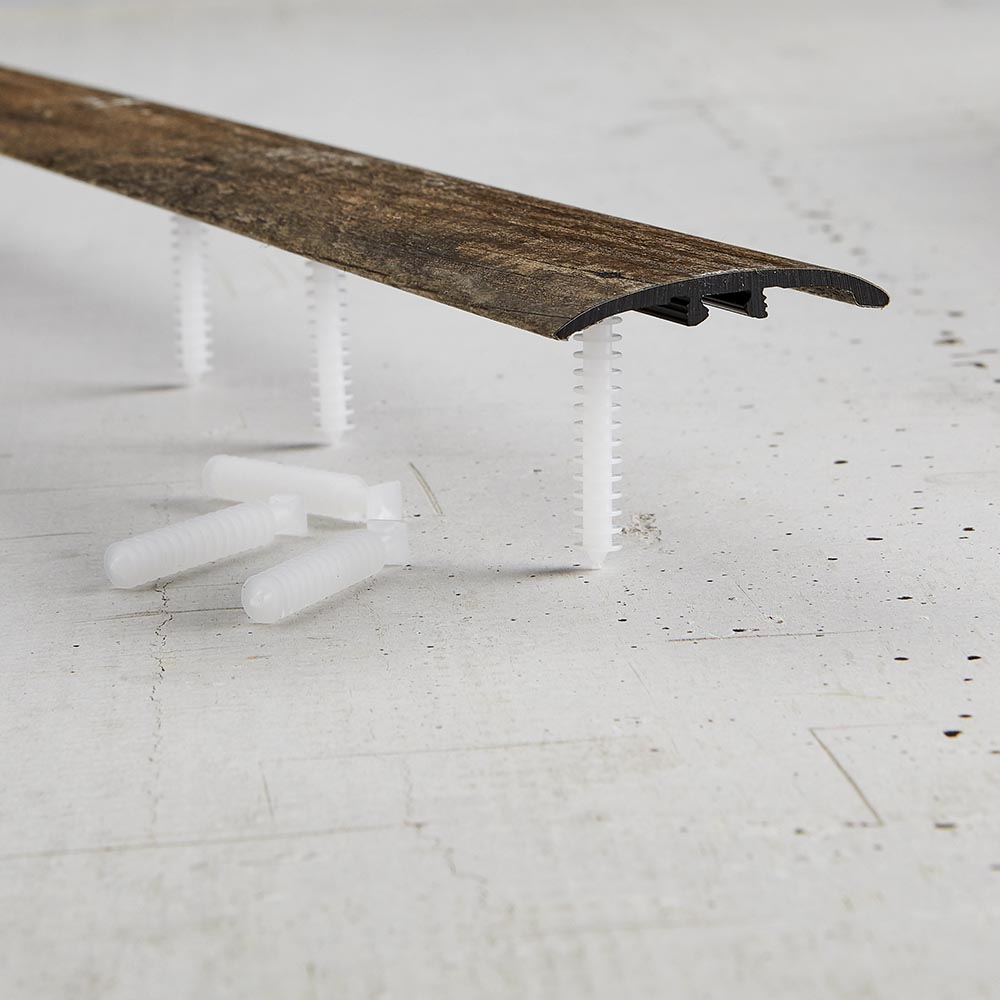
Our transition molding offers a unique, low profile multi-function transition with a variety of uses. It will work as a T-Molding, Reducer or End Cap/Carpet Transition. As a Reducer, it can accommodate up to a remarkable ¾-inch (19mm) reduction.  Plastic dowels included for easy installation. 

    Step 1: Slide one dowel into molding groove and position in center of molding. Insert additional dowels from both ends. Space dowels 11.5”apart and 1.5” from ends. The surface material consists of hard wearing aluminum oxide laminate. The core is sturdy PVC. 

    Step 2: Install the flooring planks, including the underlayment, by leaving a 1" inch (25mm) gap for the installation of the molding.

    Step 3: Draw a line on the flooring for the placement of the holes. Using a 1/4” drill bit, pre-drill holes into the flooring 2” deep. Be sure to use the same measurements as the dowels, keeping the holes 11.5“ apart. With a pencil, mark on the floor where each dowel is located (You will need these for Step 7). Pencil marks should be about 1” from the pre-drilled holes.

    Step 4: Carefully line up dowels with pre-drilled holes. Make adjustments to the dowel positions on the molding if needed.

    Step 5: Using both hands, start at one end and gently push molding 1/4”down. Make sure dowel is straight and that you apply pressure directly over dowel. The best position is to hold dowel with pointer and middle fingers and push down with thumbs. Moving down the molding again, push the dowels in the floor 1/4” at a time. It should take several passes to push the molding all the way down. The fatter end of the molding MUST be placed on the lower of the two surfaces.

    Step 6: Once molding is about a finger’s width from the floor (about 3/8” or 9.5 mm), insert the tip of a glue gun under 1 edge of the molding. Apply Liquid Nails or any polyurethane constructive adhesive along 1 side of the flooring. Make sure you apply adhesive to ONLY 1 side of the molding and that all surfaces that the adhesive touches is dust and debris free. When finished applying adhesive, start again at beginning of molding and push dowels all the way down until molding is
    secure. Use a rubber mallet to gently tap on top of each dowel until molding sits flush. Use pencil marks as reference.

    LevelLock 5G stair cap for vinyl floors

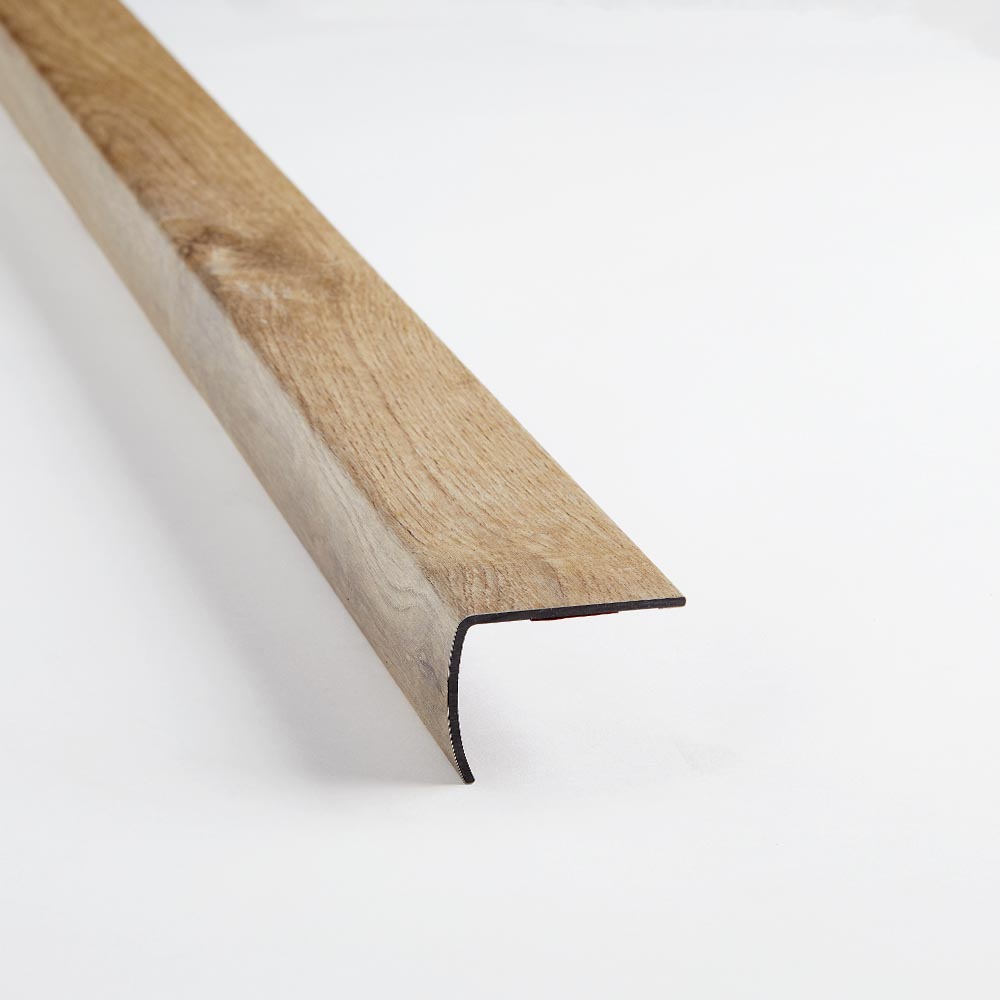
    Our matching stair caps accompanies our Rigidcore CLIQ vinyl floors perfectly and can accommodate overlap, lock down and flush mount installation methods. It works equally well for an entire stairway (flush mount) or a single step like a sunken room (overlap). It is also waterproof and is constructed of sturdy PVC and covered with a wear resistant finish.

    Step 1: Clean the staircase from all dust and debris. All wood or concrete stair surfaces must be properly prepared, stable, flat, and free of adhesive residue or anything that may be an adhesive bond breaker. IMPORTANT: Installing over existing flooring on stairs is not permitted. Existing flooring must be removed. Start at the top of the Stair Case and work your way down. The strategy, as you will see in the steps that follow, will be to glue and staple down the stair cap first. Then, glue down the plank and/or return(s). Move on to the next stair and repeat Steps 2 to 5.

    Step 2: The stair cap does not come with an underlayment. Apply enough adhesive to the broad flat area to make the Caps and Returns level with the floor plank. Turn the first stair cap over and apply adhesive on the inside corner and a generous amount of adhesive on the broad flat area.

    Step 3: Place the stair cap on the stair. Position it where you want it.

    Step 4: Make sure the underlayment is firmly and completely attached to the floor plank. If it is not, either remove it or reattach it with adhesive. Next, take the plank and/or return(s) that go with the stair cap you just fixed on the Stair. Turn them over and apply a generous amount of adhesive to them. If installing returns, apply glue to the inside corner of the return and then apply adhesive to the broad flat area of the return like you did to the Cap in Step 2.

    Step 5: Next, place the plank and/or return(s) in place. Clean up any excess adhesive with a damp rag before applying the painters tape. Use painter’s tape to tape the stair cap to the flooring plank and returns. Place a heavy weight across the seams. Let the adhesive cure for 48 hours before heavy traffic. Once dry, you can remove painter’s tape from stairs. Next, move on to the next stair and repeat Steps 2 to 5.